Showing posts with label Cookies. Show all posts

Tuesday, September 27, 2011

Cookie Pizza

Continuing the pizza theme, today I give you cookie pizza! Also known as, a cookie that looks like a pizza.

It was my labmate's birthday and unfortunately, he doesn't really like sweets. So I figured, if he was going to get a birthday cake, I might as well make it look like a savory food. I narrowed it down to either a cake that looked like a cheeseburger or a cookie that looked like a pizza. My labmate's wife told me that while he doesn't like cake, he does eat chocolate chip cookies. Cookie that looked like a pizza it is then!

So for this dessert, I used a recipe from Emeril specifically for a giant cookie cake. I guess you could use any cookie recipe (sugar, peanut butter, chocolate chip, etc.) or just buy cookie dough, but I figured the amount of cookie dough this recipe would make would be just right (I would worry less about pan overflow). I baked the dough on a 16-inch pizza pan (I think the original recipe calls for a 14-inch) leaving an inch or two for the cookie to spread out a bit. You'll want to roll this dough out as thin as you can, the outside is going to brown a lot faster than the inside and my cookie was still pretty doughy in the middle.

For the sauce, I used a little bit of cream cheese (about 4 oz.) and some strawberry jam (maybe 1/4-1/2 cup, I didn't measure). I mixed it a little powdered sugar to thicken it up but it didn't really help. Depending on how sweet your jam is, this could be skipped. I then added some red food coloring to make it look like tomato sauce. I would have made it more red but I ran out of coloring.

The cheese was grated white chocolate. I've read that some people will stick this in the oven for a couple minutes to get that melty cheese look, but I passed. For toppings, you can get creative! A lot of examples I've seen have either used fondant, fruit roll-ups, or candy chocolate for toppings. I went with fruit because it tastes good and I think collectively it would taste better than a cookie with fruit-roll ups. For pepperoni, I simply sliced strawberries into rounds. For green peppers, I sliced up a kiwi into long strips. For sausage, I sprinkled on some Raisinettes. I guess you could also use some pineapple chunks for, well, pineapple, but I forgot about it. And for mushrooms (this is what I'm most proud of), I used bananas that I sliced into rounds and then cut to form mushroom shapes. I've also heard you can cut marshmallows in a similar fashion and sprinkle a little cocoa powder on them. Anyways, for the bananas, I also dipped them in a little 7-Up because it works like lemon juice (prevents browning) but doesn't have a strong taste.

To present it, I went to a local pizza shop and asked for a new box. They were more than happy to give me one (I think they also liked the idea when I told them it was for a pizza cake). The box made for easy transport and it looked cool.

Anyways, everyone loved it and it was super delicious!


Giant Chocolate Chip Cookie Cake
adapted from Emeril's recipe (here)

1 cu butter, softened
1 cup brown sugar
1/2 cup sugar
2 eggs
2 cups plus 2 Tbsp flour
1 tsp baking soda
1/2 tsp salt
1 1/2 tsp vanilla
1 1/2 cup chocolate chips

1. Preheat oven to 375 degrees. Line a 14- or 16-inch pizza pan with parchment paper and grease parchment paper.

2. In a large bowl, cream sugars and butter. Add eggs, beating well after each addition.

3. In a medium bowl, mix flour, baking soda, and salt. Add to butter mixture and mix well. Add vanilla. Fold in chocolate chips.

4. Spread across the bottom of the prepared pan. Using hands or rolling pin, flatten dough to 1/4-1/2 inch thick, leaving 1-2 inches of space around the edge of the pan. Bake until the edges are golden brown and the cookie is set, but the center is still slightly soft, 20-25 minutes. Cool on the pan for 10 minutes, then transfer to wire rack to cool completely.

Sunday, February 27, 2011

Levain Bakery Chocolate Chip Walnut Cookie Copycat

I was watching Bobby Flay's Throwdown the other day and saw an episode I had seen before, the chocolate chip cookie throwdown. The competition was Levain Bakery in New York City and they make a giant, gooey chocolate chip cookie. And by giant, I mean they use 6 ounces of dough per cookie. That's just under a half pound. Those cookies looked amazing. Then a day or two after that, I was watching The Best Thing I Ever Ate, the chocolate edition, on Food Network. One of the chefs picked Levain Bakery's Double Chocolate Chip cookie as the best chocolately thing they ever ate. Again, that giant, giant cookie looked amazing. So I decided to search up some copycat recipes and let me tell you, it's crazy out there. People left and right are trying to master the recipe, getting the cookies to be big and puffy and crisp and gooey. While I do have my own favorite chocolate chip cookie recipe, I thought I'd give this one a try.

Here's a picture of the actual Levain Bakery cookie, now you know why I wanted to make one for myself:

Let me tell you know, this is one stiff cookie dough. I started mixing it with my hands because I got so tired of stirring. Also, from the Throwdown episode, I used walnut halves, not pieces. That way you get a big ol' piece of nut in the cookies. And my last tip, from the numerous comments on this recipe, I heard you should start with cold butter. Now if you're an experienced baker this should make you do a double-take. It is the golden rule that all ingredients should be at room temperature when you bake. This recipe says to start with cold butter and beat it with the sugars until it's light and fluffy, it supposedly helps lessen the spread when the cookies hit the oven. The recipe also says to do 4 ounce portions (smaller than the Levain cookies) but I don't have a food scale so I did 2-3 scoops with my #40 cookie scoop.

My camera was out of batteries so I had to use the camera on my iphone. My verdict: a delicious cookie but I'm unsure if it trumps my stand-by recipe. As you can see from the pictures, they're not as gooey as the Levain cookie. That was overbaking on my part, I know my oven runs hot so I tried to adjust but obviously didn't adjust enough. So with that in mind, perhaps it would have truly knocked my socks off if I hadn't overbaked. But don't get me wrong, it was a great cookie. I've never had a cookie that huge and puffy. What was really nice was the the outside was all crunchy and crispy but the inside was all soft. It was like a delicious cookie-scone. And I loved the huge walnut chunks, I don't usually put nuts in my cookies but now I might have to change my ways.

Cooling on the rack, the bottom row is 2-scoopers , the top rows are 3-scoopers. The 3-scoopers are pretty big (though in the picture they don't look that different), delicious, but a bit big.

I wanted gooey but overbaked it. I'll get you next time, Levain cookie, next time. (And look at the giant, puffy height! I've never baked a cookie this puffy before!)


Levain Bakery Chocolate Chip Walnut Cookie (Copycat recipe)

16 tablespoons (2 sticks) unsalted butter
3/4 cup granulated sugar
3/4 cup brown sugar
2 eggs
3 cups flour
3/4 teaspoon Kosher salt
3/4 teaspoon baking powder
1/4 teaspoon baking soda
2 cups chocolate chips
1 cup walnuts

1. Preheat oven to 350 degrees. Mix butter, brown sugar and granulated sugar until light and fluffy.

2. Add eggs and beat well until incorporated.

3. Add flour, salt, baking powder, baking soda and mix until just combined.

4. Fold in chocolate chips and walnuts.

5. Portion dough into 4 or 6 ounce portions.

6. Bake at 350 degrees for 20-25 minutes until cookies are very light brown. Cool on rack and store in airtight container.

Saturday, June 5, 2010

Lemon-Lime Cookies

I made these a couple years ago a few times and my parents really liked them, but I haven't made them in a while. This week, though, my company is doing a fundraiser for a charity called "Alex's Lemonade Stand" which sponsors cancer research (especially as it relates to children with the disease) and we're selling lemonade and baked goods to donate to them. Seemed like as good a time as any to bring back this recipe, so now I share it with you.

Ingredients:


Cookies:
1 cup sugar
2/3 cup shortening
1 tbsp grated lemon peel
2 tsp grated lime peel
2 tbsp lemon juice
1 tbsp lime juice
1 egg
1 3/4 cup flour
1/2 tsp baking powder
1/2 tsp baking soda
1/2 tsp salt

Lemon-lime frosting:
2 cups powdered sugar
2 tbsp margarine/butter, softened
1 tbsp lemon juice
1 tsp grated lime peel
2-3 tsp water

Heat oven to 375*. Mix sugar, shortening, lemon peel, lime peel, lemon juice, lime juice, and egg in large bowl.


Stir in remaining ingredients (except lemon-lime frosting, obviously).


Drop dough by rounded tablespoonfuls about 2 inches apart onto ungreased cookie sheet. Bake 11-13* minutes or until edges are golden brown. Cool slightly, remove from cookie sheet, and then cool completely.


Prepare lemon-lime frosting (by beating all ingredients together until smooth and of spreading consistency - I forgot to take a picture but I bet you can figure it out) and spread on cookies.


* NOTE: I remembered that last time I made them, they ended up crispier than I wanted. So this time I decreased the oven temperature to 325 and baked them for 15-17 minutes. I think it helped...?


Yeah, I remembered why I don't make these often. I hate making things, especially cookies, that require frosting. It's a pain in the butt to put on. But apparently they're good, so ya win some and ya lose some!

Friday, March 12, 2010

Ultimate Chocolate Chip Cookies

After some consideration, I'm making this my gold star recipe when it comes to chocolate chip cookies. They're perfect. Large chocolate chip to cookie ratio, a nice golden brown color, puffy, and that fantastic crunchy outer ring surrounding the lovely smushiness of cookie-interior. It's also sprinkled with some coarse sea salt before baking, while that sounds a bit odd, trust me. When you bite into these cookies and get that hit of salt on your tongue, it's a party in your mouth.

The recipe that follows is from an NY Times article describing the search for the perfect chocolate chip cookie (an interesting read, here). Following that, I've put my own adaptations on it. With that said, I've got a whole batch of frozen balls of cookie dough in my fridge. When I need a chocolately, cookie fix I just pop a couple the oven to get that warm, fresh cookie experience (and without feeling like I need to eat a million cookies while they're fresh!).

Also as a word of warning, these cookies need at least 24 hours chilling time, so keep that in mind!

Chocolate Chip Cookies

2 cups minus 2 tablespoons cake flour
1 2/3 cups bread flour
1 1/4 teaspoons baking soda
1 1/2 teaspoons baking powder
1 1/2 teaspoons coarse salt
2 1/2 sticks (1 1/4 cups) unsalted butter
1 1/4 cups light brown sugar
1 cup plus 2 tablespoons granulated sugar
2 large eggs
2 teaspoons natural vanilla extract
1 1/4 pounds bittersweet chocolate disks, at least 60 percent cacao content
Sea salt

1. Sift flours, baking soda, baking powder and salt into a bowl. Set aside.

2. Using a mixer fitted with paddle attachment, cream butter and sugars together until very light, about 5 minutes. Add eggs, one at a time, mixing well after each addition. Stir in the vanilla. Reduce speed to low, add dry ingredients and mix until just combined, 5 to 10 seconds. Drop chocolate pieces in and incorporate them without breaking them. Press plastic wrap against dough and refrigerate for 24 to 36 hours. Dough may be used in batches, and can be refrigerated for up to 72 hours.

3. When ready to bake, preheat oven to 350 degrees. Line a baking sheet with parchment paper or a nonstick baking mat. Set aside.

4. Scoop 6 3 1/2-ounce mounds of dough (the size of generous golf balls) onto baking sheet, making sure to turn horizontally any chocolate pieces that are poking up; it will make for a more attractive cookie. Sprinkle lightly with sea salt and bake until golden brown but still soft, 18 to 20 minutes. Transfer sheet to a wire rack for 10 minutes, then slip cookies onto another rack to cool a bit more. Repeat with remaining dough, or reserve dough, refrigerated, for baking remaining batches the next day. Eat warm, with a big napkin.

Jennifer's adaptations:

1. I substitute all-purpose flour for the cake and bread flour. Use the same amounts but take out an extra 4 tablespoons of all-purpose flour. This is because the conversion for all-purpose to cake flour is 1 cup minus 2 tablespoons all-purpose = 1 cup cake.

2. Ghirardelli sells bittersweet chips that are oversized and disk shaped (and can be found at most grocery stores). I do like these big chips, but regular semi-sweet chips work well too. I use one full 12 ounce bag plus just under a half of another package.

3. Watch the bake time, I find my cookies are too done at 18 minutes. I check after 12 minutes and go from there.

4. To freeze my dough, after the chilling period, I use my cookie scoop and place each dough ball into a section of an ice cube tray. I stick this in the freezer for a few minutes to make sure the dough gets nice and cold and will avoid sticking together later. You could also portion dough out on a pan and place in the freezer (if you have enough space) or just spoon the dough directly into the ice-cube tray to portion. I then stick the frozen balls into a freezer ziplock bag and double bag it to prevent any freezer flavors getting in there.


Thursday, March 11, 2010

Aw, this made me think of you...

I came across this article during my daily exploration of the "Delish" website. I figured you baking-inclined people might enjoy it. Let me know if you make any and if they actually taste like girl scout cookies!

"Almost Like Girl Scout Cookies"
Craving Girl Scout cookies in the off-season? Not to worry! Get the unique flavor and ingredient combinations the classic cookies boast from these recipe substitutes.

http://www.delish.com/recipes/cooking-recipes/girl-scout-cookies-recipes?click=pp

Tuesday, March 2, 2010

Caramel Thumbprint Cookies

People are calling me out on my Facebook wall up the wazoo. For Megan, I give you the recipe for caramel thumbprint cookies, the cookies that are as delicious as crack.

As a note, it's really important that the dough is chilled, you will probably have to rechill it as you work with it. If it's not cold it'll become a sticky, chocolately mess all over your hands. While that sounds kind of good, it is not.


Caramel Thumbprint Cookies

66 Hershey's kisses filled with caramel
1 family size (13x9-in. pan) original supreme brownie mix with Hershey's syrup pouch
1/4 cup cocoa
2 eggs
1 tablespoon vegetable oil
1 tablespoon water
1 cup ground pecans (optional)
2 teaspoons milk

1. Remove wrappers from chocolates. Lightly grease cookie sheets.

2. Beat brownie mix, pouch of syrup, cocoa, eggs, oil and water in medium bowl until well blended. Cover; refrigerate about 1 hour or until thoroughly chilled (dough will still be sticky).

3. Heat oven to 350°F. Shape dough into 48 1-inch balls. (Return dough to refrigerator if necessary or drop by rounded teaspoons onto wax paper-lined trays and refrigerate about 10 minutes.) Roll balls in pecans, if desired. Place on prepared cookie sheet; press thumb gently in center of each cookie. Bake 9 to 11 minutes or until set. Cool slightly; remove from cookie sheet to wire rack. Cool completely.

4. Place 18 caramel filled chocolates and milk in small microwave-safe bowl. Microwave at medium (50%) 30 seconds; stir. If necessary, microwave at medium an additional 10 seconds at a time, stirring after each heating, until chocolates are melted and smooth when stirred. Spoon slightly rounded 1/4 teaspoon caramel filling in each indentation. Lightly press chocolate in center of each cookie. 48 cookies.

Sunday, December 6, 2009

Thick and chewy chocolate chip cookies

Here's my standard recipe for chocolate chip cookies. I have another recipe that's more "ultimate" but it requires more work, chilling for 2-3 days and not for standard use. These cookies however turn out good n' chewy and easy to pull off spur of the moment.

Pretty standard cookie stuff. Since I bake often I usually have the necessary ingredients on hand so these cookies are my go-to recipe when I need to bring something to a party and haven't thought about it beforehand. This time I did realize that I didn't have enough chocolate chips so I threw in some butterscotch ones to make up for it.

Dry ingredients get mixed together, pretty normal. What's not normal is that the butter is melted. This is why this recipe is great for spur of the moment cookies. No need to remember beforehand to let the butter soften (I forget quite often) and if you're like me and freeze your butter, the melting is super helpful as you don't have to wait for it to thaw and then soften.

Melted butter and sugars get mixed together, then the eggs (the extra yolk is for a little extra fat which = soft and chewy, I read this) and vanilla until they kind of look like "coffee" pudding or something. It's going to seem too wet because of the melted butter.

Dry ingredients get added to wet, add your chips (I usually like to add a lot, like 1 1/2 cups) and you get a pretty decent looking dough. I sometimes chill my dough for a hour or so, not necessary but whatever.

My mom bought me a cookie scoop and let me tell you, I love that thing. Scooping out dough is so easy and really quick. You can knock out a couple sheets of dough in no time. And it makes your cookies all the same size, I used to have problems with that.

You have to be careful when you bake them for the first time. All ovens are different and you'll have to find out your own oven time. The reason for this is that you want to be careful not to overbake. Pull them out when they're light golden brown and the centers are still soft and puffy. Technically you're underbaking them, but you cool them on the sheets and the residual heat cooks them off and you get really soft cookies that stay relatively soft. On another note, this recipe doesn't make a huge load of cookies (I only used two sheets). Which is nice as you don't have a million cookies to eat at the end of the day. Which could also be bad...


Thick and chewy chocolate chip cookies

2 cups plus 2 tablespoons flour
1/2 teaspoon baking soda
1/2 teaspoon salt
12 tablespoons unsalted butter, melted and cooled until warm
1 cup brown sugar
1/2 cup sugar
1 egg plus 1 egg yolk
2 teaspoons vanilla
1-1 1/2 cups chocolate chips

1. Preheat oven to 325 degrees.
2. Whisk flour, baking soda and salt together in a medium bowl, set aside.
3. Either by hand or with an electric mixer, mix the butter and sugars until thoroughly blended. Beat the egg, yolk, and vanilla until combined. Add the dry ingredients and beat at low speed just until combined. Stir in the chips to taste.
4. Portion dough in balls and space 2 1/2 inches apart on baking sheets.
5. Bake until cookies are light golden brown and the outer edges start to harden yet the centers are still soft and puffy, 15 to 18 minutes. Cool the cookies on the sheets.

Saturday, November 28, 2009

Andes Mint Chocolate Cookies

Once again, these have become kind of signature cookies for me, but I don't know if I ever made them for you guys... regardless, it's a recipe from my cousin Jaime and they are freakin' delicious! I'm running out of "staple" cookie recipes and soon we'll have to venture into less certain waters, but for now, these cookies are proven winners. Enjoy!

The ingredients:


3/4 cup butter
1 1/2 cups packed brown sugar
2 tbsp water (not pictured... but I'm guessing you'll have some around!)
1 bag (12 oz) chocolate chips
2 eggs
2 1/2 cups flour
1 1/4 tsp baking soda
1/2 tsp salt
2 boxes Andes mints, cut in half

Blend flour, baking soda, and salt in a small bowl, set aside.


In a large saucepan, over low heat, stir butter, sugar, and water until the butter melts.


Add chocolate chips and stir until partially melted (about half the size). Remove from heat and stir until completely melted. Pour into a large mixing bowl and let stand for about 10 minutes to cool slightly.


Beat at high speed and add eggs one at a time. Reduce speed to low and add dry ingredients until just blended.


Refrigerate dough for 3-4 hours. Then roll into small balls (about 1" diameter) and place on a cookie sheet about 2" apart. (Here I generally squish them down with my palm a little bit, so that they don't crack later in the process when we add the Andes mints.)


Bake at 325 degrees until they puff up (about 10 minutes); remove from oven.


Pat down and then place a mint on top of each cookie, give them a few seconds to melt a little, then marble with a knife (or the back of a teaspoon or a spatula).


Let cool, then store in an airtight container so that they don't get dry! :-)

Monday, November 23, 2009

Secret's Out... Megan's Ginger Cookies Recipe! :-)

The famous ginger cookies from the bachelorette party... they have also seen success at Ole Bells and Bells of the Lakes rehearsals/performances/events, at work and at family Christmas! Enjoy!

(This one is hard to part with, as it has become sort of my specialty and I might be giving away my "edge," but I trust that if you make them, you'll at least think happy thoughts of me... and I'm a firm believer in recipe sharing rather than recipe secrecy, because who knows when one of you will make these delicious little cookies and I'll get to eat them!?)


The ingredients:


½ cup shortening
½ cup molasses
1 egg
½ cup sugar
2 ¼ cups flour
½ tsp baking soda
½ tsp salt
1 ½ tsp cinnamon
1 tsp ginger
1 tsp cloves
½ tsp nutmeg


Combine dry ingredients in a large mixing bowl.


(before and after... by the way, this combination of spices smells DELICIOUS!)


Cream moist ingredients, then add to dry ingredients.


(voila!)


Chill dough.


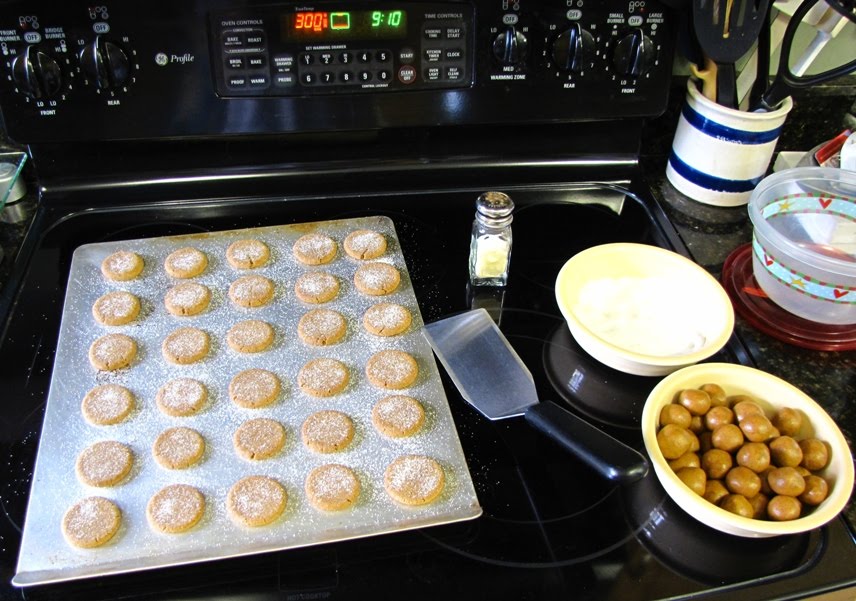
Roll into small balls (about 1 inch in diameter) and roll in sugar, then place on a baking sheet. You don't need to leave much room around each ball; they stay pretty small.


Bake at 300 degrees for 10 minutes, then remove from oven.


Pat down each cookie, then sprinkle with sugar and pat down again.


There you go! Repeat until you run out of dough (obviously)!


Note: store in a sealed container so that they stay nice and chewy!